Monday, March 9, 2015

The Centaur

So I know it is March and extremely far away from last year's Halloween and this year's Halloween but I wanted to share the awesome costume I made last year. I started it on Labor Day to have it ready for mid October.

I made myself into a centaur, Half human and half horse.


This was a big costume and it took a long time to build. With the help of my husband I built it from nothing. I'd like to share how this was accomplished.
 
The costume has a two main parts. The first is the big horse body piece. The second is my shoes. I modified some platform shoes to create the horse leg appearance for my own legs.
 
For the body we started with a PVC pipe skeleton. We used pipe glue to fit it together. We used my body's measurements to guide our scale but later shortened the horse torso as it was way too long and looked funny.
 
We set the back legs on casters. Though I've seen on the internet how some people have made centaurs with the legs moving with your human legs, I thought it better to avoid that mechanical nightmare for myself. I am not mechanically inclined enough for all of that.
I used chicken wire to create the shape of the horse body.


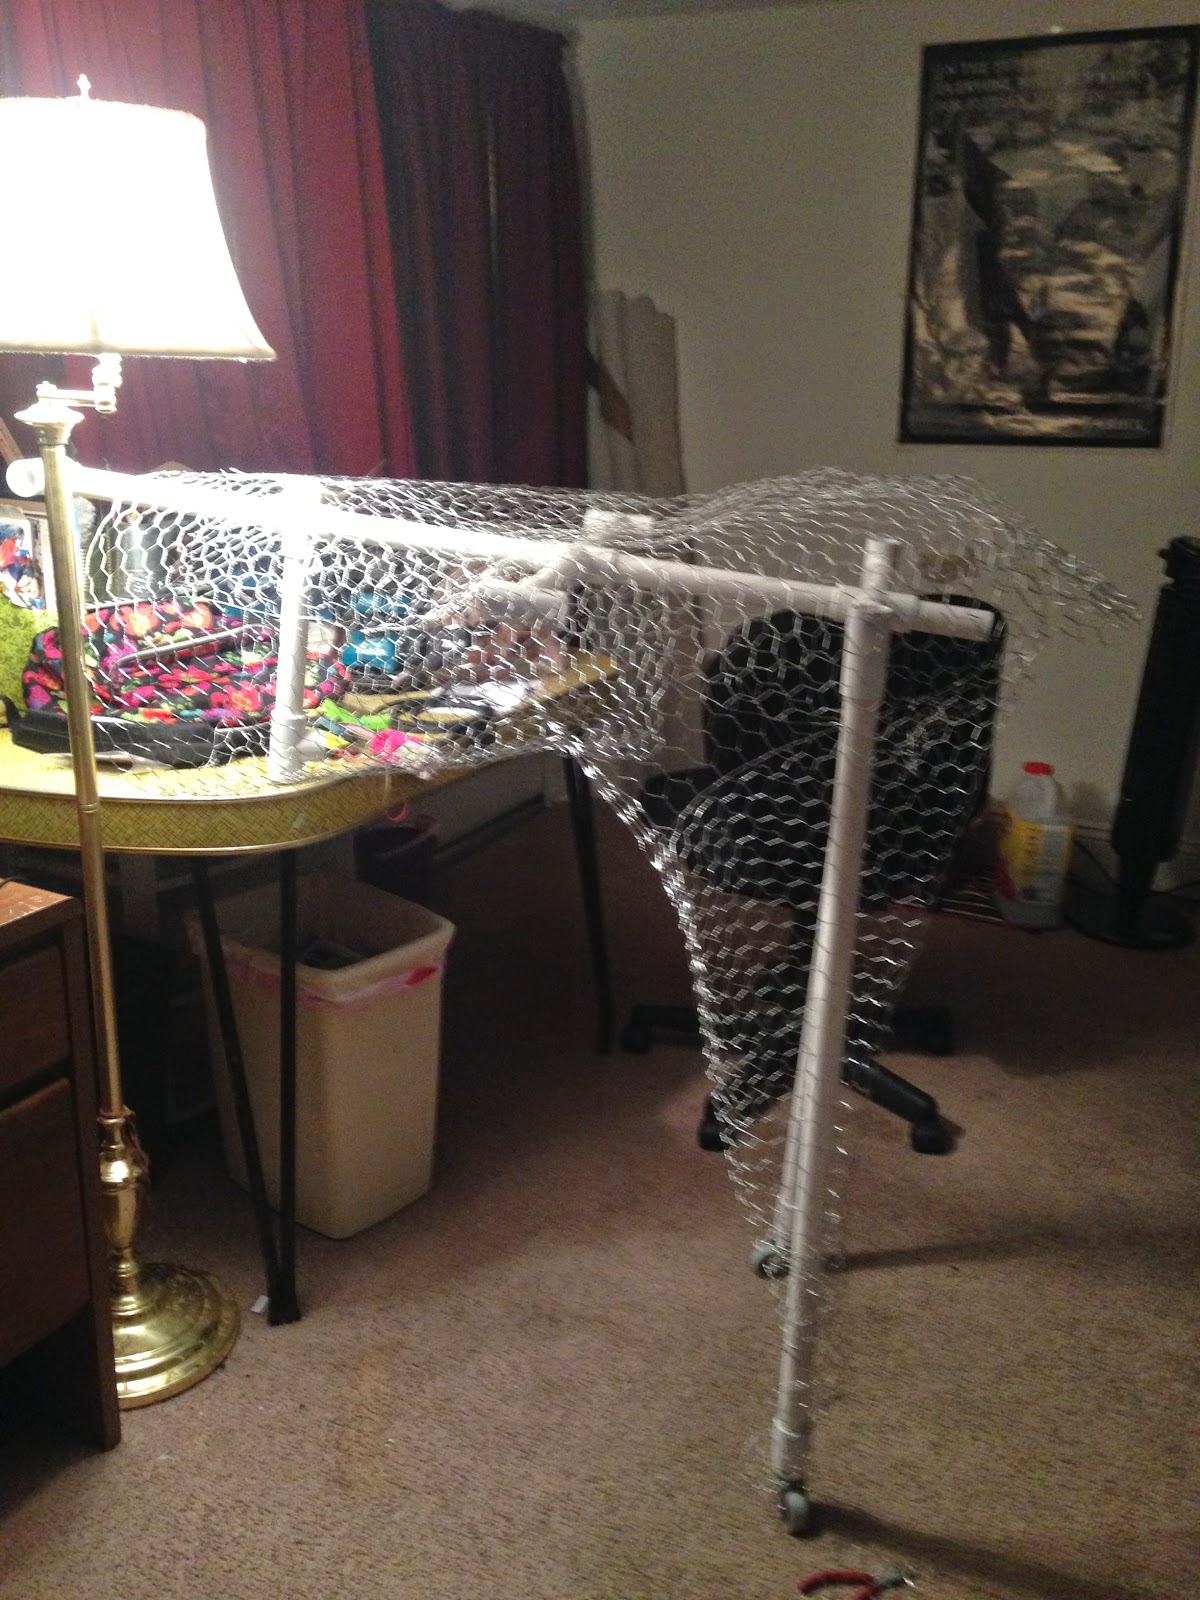
At this point, I thought the legs needed reinforcing so I began to cover them in duct tape. I wanted to get the ankle shape right.


I had considered covering all of the body in tape but changed my mind. Instead, I covered the body in a comforter that I picked up at Goodwill. It was probably a double or queen size. Using a layer of comforter between the chicken wire and my "skin" fabric gave the body more stability, a softer feel, and prevented the wire from showing through.

I hand stitched the comforter around the body with a large needle and embroidery floss. In some places, such as the opening in the front, I sewed the comforter directly to the wire frame.

By the way, working with wire is dangerous and I cut my arms up frequently throughout the process.

Once the comforter was in place it was time to put on the skin. I found an imitation suede upholstery fabric for this purpose. I wish I could tell you the yardage that I used but I bought several partial rolls and I'm not sure how much I did use.  I was sick of hand sewing so I used liquid stitch for most of this step. It worked well and make the fabric lay flatter that it would have if I'd sewn it. I only sewed places where I wanted the fabric to curve. The fabric did not stretch well so it was difficult to get a good fit.


Then it needed a tail and some hooves. For the tail I bought a couple packs of synthetic hair from Sally Beauty. This hair was very inexpensive. I got the 30'. It was loose, not attached to a weft. The hair in the package is folded over in half so I used it that way to make my tail. I hand stitched the loop of the folded hair to the center of the rear. For the hooves glued strips of craft fur over the lower part of the foot to disguise the wheels and I colored any brown skin that was showing below it with a black sharpie.

That's how I made my horse. The horse body attaches using a belt threaded through the pipe in the frame so its very sturdy. I created a pair of pants out of the same fabric to wear with everything and match.  I later embellished the horse body with leather belts and straps and bags and even got a costume bow and quiver.

So let's back up a bit. While I was making my horse body I was also working on a pair of shoes to make my human legs look more equine. I started with a cute pair of platform prom shoes from Goodwill.
Aren't they beautiful?
 
First I removed the heels. The lack of heels is what creates the horse ankle shape. The shoes were already tall but I needed them to be taller because horses are very tall and I am not. I attached a 1.5 inch tall block to each platform using screws.


I carved and sanded the blocks into a round hoof like shape.


I used my height with the shoes on as a guide for the length of the legs on the horse body. The horse body will only fit me with the shoes on.


 With the blocks attached and shaped (and painted!), it was time to cover the shoes in my horse skin fabric. I used liquid stitch for this too except where I used tiny nails around the wood "hoof".

I left the original ankle straps on the shoes to give me some added stability. I'm really not into breaking my ankle, I promise. It took some strategic cutting and gluing to get the fabric to sit right around the top of the shoe. Then I made holes with eyelets to lace the shoes together. I also used the craft fur around the hoof to match the hooves on the horse body.


The shoes look high in the photos but they actually only come up to my ankles.
 
So there you go! That is how I made myself into a centaur last year. I wore an old belly dance choli top and a scarf and my tribal jewelry and a long wig to make my human half look kind of tribal and wild. The scarf was needed to hide the transition from the horse body to my body.
 
 I was so completely proud of it. I competed in a Halloween costume contest at a party and won second place.


Thursday, April 10, 2014

This is a Thing

Lately I've been seeing ladies wearing headbands a little differently. At first I saw them on a couple of women at a Paul Mitchel class. Then I started seeing them for sale at the supply house. Now one of the gals at the salon has started wearing the style.
It looks cool!
 
 
Some girls are wearing them across their foreheads and some wear them above the hairline.


The style can be casual or glamorous!


Some would say that it's a throwback to the 70s. The style does have kind of a flower child feel to it.
 

Cher rocked it.
 
 
When I first saw the style it reminded me of the 20s.


Whatever your take on it, give it a try. Add your own spark to a new-old style.
Rock it.
Own it.
Fearlessly.


Wednesday, April 9, 2014

Brazillian Blowout! OMG!!!

Hello, all! Let me begin by sending you my sincerest apologies for neglecting my blog for OVER A YEAR. Sometimes life just steam rolls over you and you just go on. I want to keep up with this blog and give you all fun things to read and think about so I promise you I will work on keeping my posts current and regular from now on.

Now on to the good stuff....

Who has problems with frizz? Most of us, really, especially if you have curly hair. Brazilian Blowout is a smoothing treatment for frizzy or curly hair.

It is NOT a relaxer, though on some people it does reduce the curl. The product works by creating a protective protein layer around each hair, smoothing the cuticle and eliminating the frizz.  the treatment not only doesn't damage the hair, it actually leave the hair healthier.  The treatment only takes 90 minutes to 2 hours time and the results last for 12 weeks. Another great thing about this treatment is that it gradually fades off rather than creating a root line like a relaxer would.  I've had clients tell me that getting a Brazilian Blowout has changed their lives. It is awesome to not have to spend an hour to make your hair look presentable. All the time saved is priceless!
To maintain your Brazilian Blowout there is a line of shampoos and styling products designed specifically to keep your Blowout looking beautiful for as long as possible. Its super important to take home at least the shampoo and conditioner. These products are sulfate free and contain a blend of natural antioxidants that conditions your hair cuticle, ensuring that every time you wash and condition your hair, you'll give it a healthy boost of nutrients that compliment and extend the life of your smoothing treatment while adding shine and flexibility.

Yesterday I did a Brazilian Blowout on Bekah. She has naturally curly hair that has damage from color and heat styling. Frizz and damage have been big issues for her.


It was a mess. She complained about always having to spend up to two hours to blow it out and straighten it. She would end up using her flat iron a lot which then caused more damage and led to even more frizz. This created a vicious cycle for her in the care and management of her hair. 
After I did the Brazilian Blowout treatment, I began to blowdry her hair without using a brush. It was amazing how smooth her hair was just rough drying! When her hair was dry, I only needed to flat iron a little through the top to achieve the silky straight look she likes to wear.

Another cool thing about the Brazilian Blowout is that after the service is done there is no waiting period. You can do whatever you want with your hair after its done and it won't affect the result. So we put her hair up in a nifty bun with the back french braided up.
It's a really great way to keep the hair off the neck.

You can get color and a Brazilian Blowout in the same day and the Brazilian will actually seal in your color and prevent fading, making it last longer. It's such a cool treatment!

Call or email me (see appointments page) if you are interested in learning more about this unique service.


Tuesday, February 26, 2013

Sexy Hair


The other day my salon had a product education class on the Sexy Hair lines. I have not used this line really at all. Some of the products have me very excited to try.

Sexy hair has six lines, Big Sexy, Healthy Sexy, Short Sexy, Curly Sexy, Straight Sexy, and Silky Sexy.

Here are a few highlights of what I learned.


The Big Sexy Hair product line was the line that started it all. The products have moisturizing ingredients to protect the hair from drying out. They have two root boosters,  the Root Pump and Root Pump Plus. These products are a spray foam that you can direct onto the root area for volume. The shampoo and conditioner are gentle enough for color treated hair. I was pleased to learn that they are sulfate free and paraben free.
I tried the Spray and Stay maximum hold hairspray and I really wanted to like it. It just didn't seem to have enough hold for me. I realize that it is designed to be a touchable hold, but I just wasn't getting the hold I wanted. I'm too committed to my Kenra 25 Volume Spray.
One product I can't wait to get my hands on is What a Tease. It is an aerosol spray that is like back comb on a can. You spray it on a section of hair and just pull that section apart and it looks and feels like you just teased it. This product will be great for my clients that like a bump in the crown or those with super fine hair that struggle to achieve volume.

I can really see myself using a lot of products in the Healthy Sexy Hair product line. There are actually two lines in this line. The products with the brown caps are designed to repair heat damage in hair and the products with silver caps are for chemical damage. The shampoos are made with soy and cocoa to soften the hair and are sulfate, paraben, and gluten free. The Soy Renewal treatment is comparable to Moroccan Oil at half the price. There is also a great leave in conditioner with UV protectant.

The Short Sexy Hair products include various clays, waxes, creams, pastes, pomades, and gels. They are designed to be mixable to create even more styles and degrees of hold and shine. In the near future they will be changing the name of this line because you don't have to have short hair to rock these products. I really like the Quick Change. It is a heavy lotion-like product with fibers in it. It looks like glue the way it strings. I like to use a product like this on hair I want to stand up. the fibers help to hold it up. They are also really pliable. You can mist your hair to reactivate the product and then restyle the hair another way easily (hence the name, Quick Change).

I can't wait to try more of these!